In this article
Building Enterprise Quality REST API Integrations: An Extensive Walkthrough
A comprehensive guide to building enterprise-quality REST API integrations for SaaS applications. Learn best practices, from understanding API requirements to building robust, scalable, and secure integrations.

By Agni Bhattacharya
Software Developer
Aug 14, 2024
9 min read
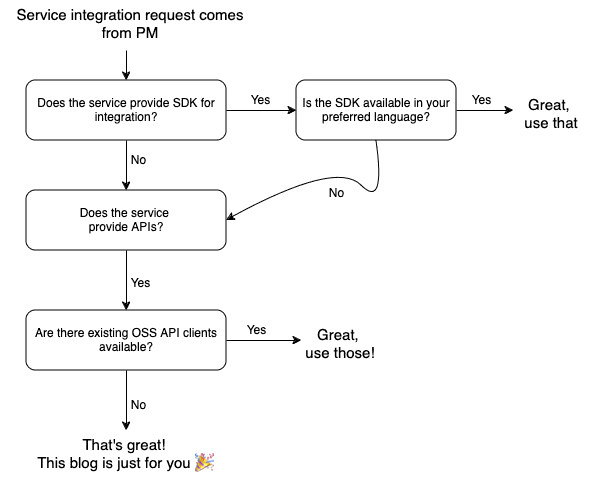
As a software engineer, how do you proceed when a new service needs to be integrated into your product? Well, before we get to that, you need to dig into a few follow-up questions first, this is described via the flowchart below -

Once you have decided that you need to get your hands dirty and write an API client from scratch, the fun begins! In this blog, we’ll walk through the whole process of implementing a REST API client from first principles. Remember, this is an enterprise-quality API integration, so we won’t be jumping straight to writing code. Instead, we’ll first focus on proper documentation, implementation, testing & debugging plans.
Assessing The Requirements
Before you start your implementation or even write a technical document, the most important part is to understand the business requirements and the capabilities of the service you’re integrating. This broadly involves:
Understanding the API
Start by thoroughly reading the API doc’s introductions section as you’ll get to know about all skimming over all available endpoints, paying attention to the available authentication methods, rate limits, request-response structures, available fields, etc. These are going to be the fundamentals of your integration and should also be discussed in detail in the technical documentation.
For example, if you’re integrating with a CRM system like HubSpot, you might want to understand:
The structure of different objects like Contacts, Companies, Deals, etc.
Different types of authentication methods supported by HubSpot and the tradeoffs between them.
Supported timestamp formats as this can get tricky given the numerous available formats and timezones.
Identifying use cases
In most cases, you don’t need to implement all the available APIs, instead only a select few are needed. At this pre-implementation stage, you should have a clear understanding of which API endpoints are actually needed. For example, you should be able to answer whether a bulk API endpoint should be used or a single record per request endpoint will suffice.
Consider the following scenarios:
Do you need real-time updates or is a periodic sync sufficient?
Are you going to deal with large volumes of data that demand bulk operations?
Will your integration be webhook based for event-driven updates?
Asking yourself these questions early on will help you better prepare the design document and efficiently implement the integration.
Security Considerations
Based on the feature requirements, you should think about potential security risks. For example, if you’re dealing with Personal Identifiable Information (PII) data, then you need to plan your implementation accordingly, and maybe redact or encrypt that data.
Scalability and Performance
Consider the expected load or how to handle large volumes of data efficiently. Will you need to implement pagination for large data sets? How will you handle API rate limits? Do you need to implement a caching layer? It’s best to address these questions early on.
Some commonly used design patterns:
If you’re expecting to handle thousands of records, you might want to implement concurrent API calls with proper rate limit handling strategies.
For frequently accessed data that doesn't change often, a caching layer in the application would significantly reduce API calls and improve the overall performance.
Creating a Technical / Design Document
With a clear understanding of the requirements, the next step is to create a comprehensive back-end design document. This document should serve as the blueprint for your implementation and ideally, should also be peer reviewed.
You might be wondering why you should waste your time in writing a document when you can just implement the API client, raise a PR and get done with it! Well, there are lots of reasons why, but let’s just consider these:
Your implementation approach might be wrong. Or there might be a better way that you have overlooked. Isn’t it a good idea to have your document peer-reviewed and discuss potential improvements early on?
Writing a design document forces you to think deeply about the problem statement and your proposed solution. In the process, you’re actually doing half of the work.
Speeds up the PR review process as all the changes you’ll be making are already discussed within your team via the document.
Much easier handover to new people joining the team or existing team members extending your initial implementation. You can avoid multiple meetings and KT sessions if you have proper documentation in place.
After writing enough documentation, you’ll realize that this actually saves everyone’s time instead of wasting yours. 🙂
Now let’s get into what your technical document must include:
Overview and Scope
The essence of your integration, i.e. the problem statement must be highlighted at the beginning of the document. This ensures you have a proper understanding of the business requirements and sets the context for all the reviewers.
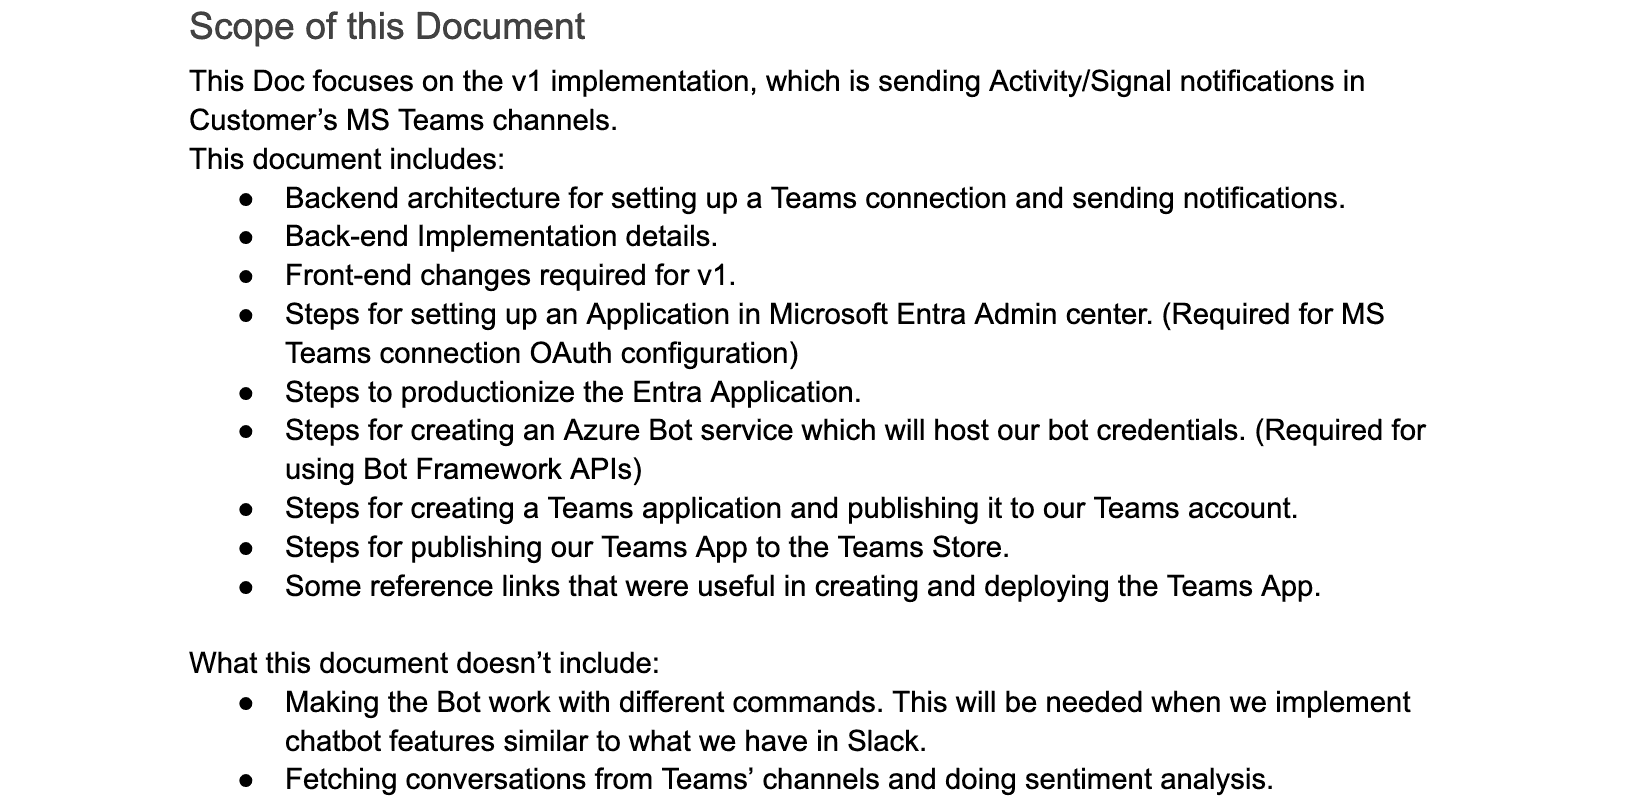
In some cases, where the document can span multiple pages, you should also mention the scope of this document, i.e. what’s covered in the document and what’s not covered.
For reference, here’s what the Scope section looks like in a design document that I wrote while integrating MS Teams App and various APIs -

Architecture Diagram
Depending on the extent of your integration, you might want to layout the whole flow of your application incorporating the expected changes made by your integration. This section might not be very useful for simple API integrations, but very valuable for complex ones involving multiple components and interactions.
This also helps new developers quickly get up to speed by reviewing architecture diagrams, and understanding how different components in the system work together.
API Endpoints Overview
Out of the numerous endpoints supported by the external service, it’s important to jot down the ones you’ll be using along with relevant reference links. This helps reviewers to get an understanding of the available endpoints and that in turn makes the review process smoother.
Authentication and Authorization Flows
Interacting with external services via APIs requires you to authenticate your request and in some cases, you must have permission to access a particular resource (Authorization).
It’s recommended that you think of the tradeoffs between different authentication methods supported by the API provider and mention the reasoning behind whichever method you choose.
Most API providers support 2 types of authentication methods - API key based authentication and OAuth 2.0 authentication flow.
For example, in the case of HubSpot, you need to register your integrations on HubSpot, which are called Apps in HS terminology. It’s recommended to use the OAuth approach in case you want to list your App in the HS marketplace. For private Apps, it’s recommended to use an access token based approach (similar to an API Key, but with configurable scopes)1.
Proposed Code Changes
This section should include all your code changes in as much detail as possible. At FunnelStory, we usually make sure to include the following details:
Database schema design changes or additions.
Data models required to represent the data returned by the APIs.
A blueprint of the API client structure and methods that you plan to implement.
The logical flow of the whole integration, if applicable.
Testing Plan
At FunnelStory, we focus extensively on unit tests and E2E tests. This enables us to catch regressions early on and it’s recommended that you have a well-thought-out testing plan in the initial phases of the planning.
Some relevant details that you should consider including in this section:
Suitable interfaces that’ll help in mocking the API client.
Some edge cases that must be addressed in unit testing.
Libraries/Packages that you’ll be using for testing/mocking parts of the code.
Mention potential significant changes in code coverage, if any.
For instance, we use a Go package called httpmock that allows us to simulate request/response cycles. By using this approach, we can write test cases without making calls to the live APIs.
Monitoring and Debugging in Production Environments
Does following all the above steps and then finally getting your code reviewed and merged save you from facing production bugs? No, of course not. Bugs are practically inevitable and the best you can do is be well prepared for them.
Here are some best practices that we use at FunnelStory:
Structured Logging & Error Wrapping
We always use structured logging with proper log levels. This allows better filtering of logs based on different levels like (INFO, ERROR, WARN, etc.)
Along with logging, it’s also very helpful to return meaningful error messages with proper wrapping. This adds context to errors as they propagate up the call stack and makes it easier to understand why and where an error occurred.
Here’s an example of structured logging in Go, using the Open Source zap library:
logger.Info("fetching contact", zap.String("contact_id", "123"))
// Output: {"level":"info","ts":1721993068,"caller":"example/main.go:10","msg":"fetching contact","contact_id":"123"}
logger.Warn("failed to fetch contact", zap.String("contact_id", "123"), zap.Error(errors.New("network error")))
// Output: {"level":"error","ts":1721993075,"caller":"example/main.go:13","msg":"failed to fetch contact","contact_id":"123","error":"network error"}
logger.Info("successfully fetched contact", zap.String("contact_id", "123"))
// Output: {"level":"error","ts":1721993075,"caller":"example/main.go:18","msg":"successfully fetched contact","contact_id":"123"}
Request IDs for Tracking
Using request IDs to track HTTP requests across the system is quite helpful in finding root causes quickly. At FunnelStory, this has helped us a lot in debugging complex issues in production.
Here’s a simple middleware to add request IDs to your Go back-end:
func addRequestID(next http.HandlerFunc) http.HandlerFunc {
	return func(w http.ResponseWriter, r *http.Request) {
		requestID = uuid.NewUUID()
		ctx := context.WithValue(r.Context(), "requestID", requestID)
		w.Header().Set("X-Request-ID", requestID)next.ServeHTTP(w, r.WithContext(ctx))
	}
}
This middleware generates a new request ID and adds it to both the request context and response headers. Yep, it’s that simple!
It’s also recommended to pass this generated request ID to the logger, at the beginning of the request-response cycle so that all the subsequent logs generated as part of a request have the request ID reference.
Setting up alerts
Setting up alerts is extremely helpful for catching bugs early on, without your customers noticing them first. You might want to set up alerts for:
Sudden spikes in API error rates.
Rate limit breaches.
Validation errors from your integrations. (This might indicate a versioning change in the APIs)
Some Common Issues
Data Serialization: REST APIs mostly transmit data as JSON objects. In Go, you can use the encoding/json package to marshal (serialize) and unmarshal (deserialize) data. If you encounter errors like json: cannot unmarshal, this indicates issues with serialization or deserialization.
Extracting Information: After deserializing a JSON response, access properties using struct fields or map keys. For deeply nested data, break down the structure step-by-step to avoid accessing nil values. Here’s a Go snippet:
var response map[string]interface{}
err := json.Unmarshal(responseData, &response)
if err != nil {
  // handle error
}
if nestedData, ok := response["nested"].(map[string]interface{}); ok {
  // access nestedData
}
Data Types: External APIs can return various different types of data. It’s essential to know these data types beforehand and create your data object fields accordingly. In Go, you can use type assertions to assert the type of any variable to ensure you’ve the expected data type.
Conclusion
We walked through the whole process of implementing an external API and discussed some of the industry's best practices and how to avoid common pitfalls. At FunnelStory, we put all these practices to the test with a wide variety of integrations with services like HubSpot, Salesforce, Zoom, Zendesk, Slack, Microsoft Teams, and many others.
To summarize, building enterprise-quality API integrations isn't just about writing code. It's also about thorough planning, clear documentation, rigorous testing, and being prepared for the unexpected bugs.


